Write Dynamic Config App
Build a simple JavaScript Dynamic Config App. This app will make use of CircleCI's Dynamic Config to build a CircleCI Config YAML at run-time.
See the full source for this example.
In your git repository, in the root directory ensure there is a .circleci/ directory.
Then add a config.yml file and a dynamic (or any name) directory.
└── .circleci/
    ├── dynamic/
    └── config.yml
Our dynamic directory will contain our actual config application source.
The config.yml file will use CircleCI's Dynamic Config to build our config file in the dynamic directory and execute it.
Copy and paste the following YAML into config.yml
version: 2.1
orbs:
  # Continuation orb makes it easy to send
  # the generated config to the continuation API.
  continuation: circleci/[email protected]
  # Node orb used to build our config app in a Node environment.
  node: circleci/[email protected]
setup: true
jobs:
  generate-config:
    executor: node/default
    steps:
      - checkout
      # Cache our app
      - node/install-packages:
          app-dir: .circleci/dynamic
      # Generate config. Our `app.js` will write
      # `dynamicConfig.yml` to a file.
      - run:
          name: Generate config
          command: |
            node .circleci/dynamic/app.js
      # Pass the generated dynamic config to the
      # Continuation orb to trigger the Pipeline.
      - continuation/continue:
          configuration_path: ./dynamicConfig.yml
workflows:
  dynamic-workflow:
    jobs:
      - generate-config
This will run our config application in dynamic/ and execute it on every push. We are defining a dynamic workflow by providing the setup: true key-value pair. This is a special key that will allow us to take advantage of Dynamic Config.
The CircleCI Config SDK is a library that can be used in any Node/JavaScript application. The goal of the "config app" will be to generate a new CircleCI config YAML file and write it to disk.
This allows you to use JavaScript to implement logic to modify how we generate our config file using external inputs, such as run-time environment variables, HTTP calls, git data, etc.
Specifically in our example config app, we will accomplish the following:
- Create one reusable Docker executor (NodeJS) module
- Create two job modules
- Each job will use the reusable executor
- Conditionally add
jobBto the workflow using an if statement in JavaScript
-
cdinto the./circleci/dynamicdirectory as this will hold all of our config app's source code. -
Run
npm initoryarn initto initiate the app and create apackage.jsonfile. a. Once entered, a prompt will appear asking a series of questions. Enter any values you prefer or leave the defaults except formain, ensure this property has the valueapp.js -
Install the CircleCI Config SDK. a.
In this example, each job and executor will be exported as separate modules so they could more easily be re-used the future.
Inside ./circleci/dynamic, create two directories: executors and jobs.
└── .circleci/
    ├── config.yml
    └── dynamic/
        ├── executors/
        ├── jobs/
        └── package.json
- Add to the
dynamic/directory a newapp.jsfile - Add to
dynamic/executors/adocker-node.jsfile - Add to
dynamic/jobs/two files: a.jobA.jsb.jobB.js
└── .circleci/
    ├── config.yml
    └── dynamic/
        ├── executors/
        │   └── docker-node.js
        ├── jobs/
        │   ├── jobA.js
        │   └── jobB.js
        ├── app.js
        └── package.json
The main application which will generate the final CircleCI Config YAML file.
Begin by importing the CircleCI Config SDK
const CircleCI = require("@circleci/circleci-config-sdk");Import config components, these will be created in a few steps.
// Import Config Components
const dockerNode = require("./executors/docker-node");
const jobA = require("./jobs/jobA");
const jobB = require("./jobs/jobB");
Initialize a new CircleCI Config.
// Initiate a new Config
const myConfig = new CircleCI.Config();
Add all config elements to the config object.
// Add elements to the config
myConfig.addExecutor(dockerNode).addJob(jobA).addJob(jobB);
Begin to construct a Workflow. The workflow orchestrates how our pipeline will run when executed on CircleCI.
// Instantiate new Workflow
const dynamicWorkflow = new CircleCI.Workflow("dynamic-workflow");
Add jobA to the newly created dynamic-workflow workflow
dynamicWorkflow.addJob(jobA);For the sake of example, we will conditionally add jobB using a native if in JavaScript. This is to demonstrate that any programming logic could be used to modify how your config is built.
// Conditionally add jobB
if (1 == 1) {
  dynamicWorkflow.addJob(jobB);
}
Add the Workflow to the config object.
// Add the dynamic workflow to the config
myConfig.addWorkflow(dynamicWorkflow);
Stringify the config, this generates the output YAML.
// New Config file
const MyNewConfigYAML = myConfig.stringify();
Finally, write the generated config to a file.
To do this, we will need to import the node fs package. Add the following line to the top of your app.js
const fs = require("fs");And finally at the bottom of the app.js file, write the config to a file. In this example, the file is named dynamicConfig.yml.
fs.writeFile("./dynamicConfig.yml", MyNewConfigYAML, (err) => {
  if (err) {
    console.log(err);
    return;
  }
});Open ./circleci/dynamic/executor/docker-node.js
Here is the full Executor code
const CircleCI = require("@circleci/circleci-config-sdk");
const dockerNode = new CircleCI.executor.DockerExecutor(
  "cimg/node:lts"
);
module.exports = dockerNode;Open ./circleci/dynamic/jobs/jobA.js
jobA and jobB in this example are fundamentally the same but each echos out something different.
Import both the SDK and the previously created executor.
const CircleCI = require("@circleci/circleci-config-sdk");
const dockerNode = require("../executors/docker-node");
Create the new job with the name "jobA".
const jobA = new CircleCI.Job("jobA", dockerNode);All jobs require at least one step. All available steps can be found under CircleCI.Command. In this example a run step is used to echo out a message.
jobA.addStep(new CircleCI.Command.Run({ command: "echo hello from Job A" }));Finally export the job module
module.exports = jobA;Do the same for jobB.
Commit your changes and push your new ./circleci directory changes.
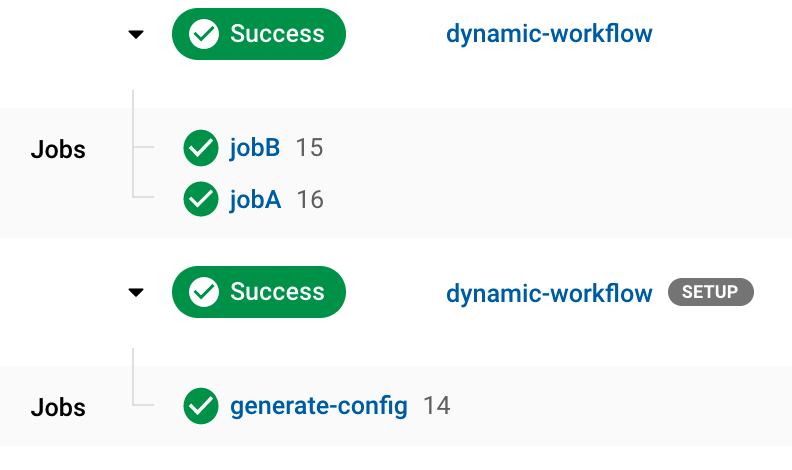
When your pipeline is triggered, you will see there will be two workflows, one will have a setup badge icon. The one with the setup badge is our config.yml file which built and executed our dynamic config, and the next workflow is the result of our compiled config!